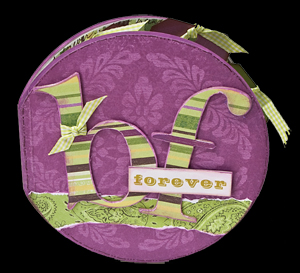
Best Friends Board Book - DIY
This is a great DIY project for that special friend! WARNING: this is for people who are good with their hands! I happen to be lousy with anything related to using my hands, so this is a project I could never do--but for you crafters out there..have fun...and make a friend feel super special!

Images provided by C&T Publishing
Materials:
- C&T Publishing Ready-To-Go! Blank Board Book 7" Circle
- Paper adhesive
- Chipboard Letters: "b" and "f"
- Bottle Cap: 1"
- Cardstock: Purple, Green
- Chalk Inks: Chestnut Roan, Warm Violet
- Decorative Papers: Deja Views Fresh Prints
- Chipboard word: "forever"
- Ribbon: 3/8" gingham (1yd)
- Text-weight paper: off white
- Circle cutting template
- Circle punch: 1"
- Craft knife
- Craft scissors
- Journaling pen
- Sand paper block
Step-by-Step Instructions:
What's fun about these Blank board Books is the ability to manipulate them. These instructions show how to cut and glue the interior pages to create an actual pocket to slide journaling tags into. How clever!
- In the blank board circle book use a circle cutter to cut a 6" circle from the center of pages 3-5. If your circle cutter does not cut completely through the page, use a craft knife to finish cutting.
- On page 2 of circle book, use circle cutter to cut a 6" half circle in upper half of page; tilted slightly to the right.
- Ink edges of all pages with Warm Violet ink.
- Using the book as a template, trace and cut decorative paper to fit both sides of front and back covers and page 2. Adhere decorative paper to book; sand edges of paper covered book to remove any excess paper.
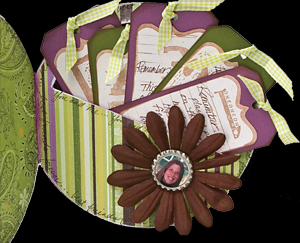
- Adhere pages 2-6 together where pages meet, creating a pocket for tags.
- Tear strip of decorative paper to fit across lower section of book cover; adhere in place. Trace and cut paper to fit chipboard letters; adhere paper in place, sand edges to smooth. Tie 6" piece of ribbon to the "b". Arrange and adhere letters and word block (forever) onto cover front.
- Use a journaling pen to handwrite words around all edges of book i.e. "best friends forever."
- Using a 1" circle punch, cut a friend's photo to fit into bottle cap; adhere in place.
- Images provided by C&T Publishing

- Adhere large flower and bottle cap to page 2 below cut out section.
- Make tag by cutting a 2 1/2" x 5" rectangle from cardstock, trim corners of one end and make a hole with a punch; repeat to make four additional tags from purple and green cardstock.
- Use text weight paper to create journaling blocks to fit the front of thetags. Adhere to tag fronts. (Designer used Stamps to create template on tags-Stamps: Art Warehouse, Big Numbers, Stampabilities, Curly Bracket, Journaling Block)
- Tie 6" lengths of ribbon through the hole in each tag. Write about a fun memory or special moment from your friendship on each tag. Tuck tags into pocket in the book.
Of course as a Photo Blog we always encourage you to use photographsin your projects, so feel free to add small images of the 2 of you together on your journaling blocks!
Article courtesy of C&T Publishing/Project Design by Roxi Phillips